Fo this you need FreeTDS libraries for making connection to your MS SQL Server from your Linux machine.
Follow the below steps to monitor the Microsoft SQL Server through Nagios :
1. Download & install the FreeTDS.
http://www.freetds.org/software.html
tar -xvzf freetds-stable.tgz
cd freetds
./configure -with-tdsver=8.0
make
make install
2. Configure freetds, make an entry for the MS SQL Server in /usr/local/etc/freetds.conf as
[MSSQLSERVER]
host = 192.168.0.25
port = 1433
tds version = 8.0
Sql server standard port is the 1433, so check the default port on MS SQL Server.
3. Check the connectivity to ms sql server from Linux machine using tsql command as
tsql -H 192.168.0.25 -p 1433 -U sa -P SA123
If you get the 1> prompt, that means you have made successful connection with ms sql
server.
Now you can start executing the query using check_mssql plugin.
4. Download the check_mssql plugin from
http://exchange.nagios.org/directory/Plugins/Databases/SQLServer/check_mssql/details
add it to your /usr/local/nagios/libexec directory
5. Then add its command definition in commands.cfg as
define command {
command_name check_mssql
command_line $USER1$/check_mssql -H 10.31.0.37 -U sa -P SA123 -q "select count(*) from
empdata" -r "10" -d newtest -w 2 -c 5
}
And also add its host & service definition as
For hosts.cfg
define host {
host_name SQLServer
alias MS SQL Server
address 10.31.0.37
check_command check-host-alive
notification_interval 15
notification_options d,u,r
max_check_attempts 3
active_checks_enabled 1
passive_checks_enabled 0
notifications_enabled 1
check_period 24x7
notification_period 24x7
contact_groups admins
}
For services.cfg
define service {
use generic-service
host_name SQLServer
service_description querystatus
check_command check_mssql
}
Then make entries in nagios.cfg for hosts.cfg & services.cfg, and restart nagios
6. Check in nagios front end for the result.
Here in above command definition it selects the number of records from a table empdata, if it returns 10, as expected result,
then the query is OK, and you will get OK status in Nagios Services section.
And if it gives unexpected results, then ultimately the query fails, and will show CRITICAL status in Nagios Services section.
Please let me know if you have any queries on this.
Monday, October 25, 2010
Monday, August 23, 2010
Basic Linux Commands
Basic Linux Commands -
adduser - Add a user to the system
addgroup - Add a group to the system
alias - Create an alias •
apropos - Search Help manual pages (man -k)
apt-get - Search for and install software packages (Debian/Ubuntu)
aptitude - Search for and install software packages (Debian/Ubuntu)
aspell - Spell Checker
awk - Find and Replace text, database sort/validate/index
b
basename - Strip directory and suffix from filenames
bash - GNU Bourne-Again SHell
bc - Arbitrary precision calculator language
bg - Send to background
break - Exit from a loop •
builtin - Run a shell builtin
bzip2 - Compress or decompress named file(s)
c
cal - Display a calendar
case - Conditionally perform a command
cat - Display the contents of a file
cd - Change Directory
cfdisk - Partition table manipulator for Linux
chgrp - Change group ownership
chmod - Change access permissions
chown - Change file owner and group
chroot - Run a command with a different root directory
chkconfig System services (runlevel)
cksum - Print CRC checksum and byte counts
clear - Clear terminal screen
cmp - Compare two files
comm - Compare two sorted files line by line
command - Run a command - ignoring shell functions •
continue - Resume the next iteration of a loop •
cp - Copy one or more files to another location
cron - Daemon to execute scheduled commands
crontab - Schedule a command to run at a later time
csplit - Split a file into context-determined pieces
cut - Divide a file into several parts
d
date - Display or change the date & time
dc - Desk Calculator
dd - Convert and copy a file, write disk headers, boot records
ddrescue - Data recovery tool
declare - Declare variables and give them attributes •
df - Display free disk space
diff - Display the differences between two files
diff3 - Show differences among three files
dig - DNS lookup
dir - Briefly list directory contents
dircolors Colour setup for `ls'
dirname - Convert a full pathname to just a path
dirs - Display list of remembered directories
dmesg - Print kernel & driver messages
du - Estimate file space usage
e
echo - Display message on screen •
egrep - Search file(s) for lines that match an extended expression
eject - Eject removable media
enable - Enable and disable builtin shell commands •
env - Environment variables
ethtool - Ethernet card settings
eval - Evaluate several commands/arguments
exec - Execute a command
exit - Exit the shell
expect - Automate arbitrary applications accessed over a terminal
expand - Convert tabs to spaces
export - Set an environment variable
expr - Evaluate expressions
f
false - Do nothing, unsuccessfully
fdformat - Low-level format a floppy disk
fdisk - Partition table manipulator for Linux
fg - Send job to foreground
fgrep - Search file(s) for lines that match a fixed string
file - Determine file type
find - Search for files that meet a desired criteria
fmt - Reformat paragraph text
fold - Wrap text to fit a specified width.
for - Expand words, and execute commands
format - Format disks or tapes
free - Display memory usage
fsck - File system consistency check and repair
ftp - File Transfer Protocol
function - Define Function Macros
fuser - Identify/kill the process that is accessing a file
g
gawk - Find and Replace text within file(s)
getopts - Parse positional parameters
grep - Search file(s) for lines that match a given pattern
groups - Print group names a user is in
gzip - Compress or decompress named file(s)
h
hash - Remember the full pathname of a name argument
head - Output the first part of file(s)
help - Display help for a built-in command •
history - Command History
hostname - Print or set system name
i
id - Print user and group id's
if - Conditionally perform a command
ifconfig - Configure a network interface
ifdown - Stop a network interface
ifup - Start a network interface up
import - Capture an X server screen and save the image to file
install - Copy files and set attributes
j
jobs - List active jobs •
join - Join lines on a common field
k
kill - Stop a process from running
killall - Kill processes by name
l
less - Display output one screen at a time
let - Perform arithmetic on shell variables •
ln - Make links between files
local - Create variables •
locate - Find files
logname - Print current login name
logout - Exit a login shell •
look - Display lines beginning with a given string
lpc - Line printer control program
lpr - Off line print
lprint - Print a file
lprintd - Abort a print job
lprintq - List the print queue
lprm - Remove jobs from the print queue
ls - List information about file(s)
lsof - List open files
m
make - Recompile a group of programs
man - Help manual
mkdir - Create new folder(s)
mkfifo - Make FIFOs (named pipes)
mkisofs - Create an hybrid ISO9660/JOLIET/HFS filesystem
mknod - Make block or character special files
more - Display output one screen at a time
mount - Mount a file system
mtools - Manipulate MS-DOS files
mtr - Network diagnostics (traceroute/ping)
mv - Move or rename files or directories
mmv - Mass Move and rename (files)
n
netstat - Networking information
nice - Set the priority of a command or job
nl - Number lines and write files
nohup - Run a command immune to hangups
notify-send Send desktop notifications
nslookup - Query Internet name servers interactively
o
open - Open a file in its default application
op - Operator access
p
passwd - Modify a user password
paste - Merge lines of files
pathchk - Check file name portability
ping - Test a network connection
pkill - Stop processes from running
popd - Restore the previous value of the current directory
pr - Prepare files for printing
printcap - Printer capability database
printenv - Print environment variables
printf - Format and print data •
ps - Process status
pushd - Save and then change the current directory
pwd - Print Working Directory
q
quota - Display disk usage and limits
quotacheck - Scan a file system for disk usage
quotactl - Set disk quotas
r
ram - ram disk device
rcp - Copy files between two machines
read - Read a line from standard input •
readarray - Read from stdin into an array variable •
readonly - Mark variables/functions as readonly
reboot - Reboot the system
rename - Rename files
renice - Alter priority of running processes
remsync - Synchronize remote files via email
return - Exit a shell function
rev - Reverse lines of a file
rm - Remove files
rmdir - Remove folder(s)
rsync - Remote file copy (Synchronize file trees)
s
screen - Multiplex terminal, run remote shells via ssh
scp - Secure copy (remote file copy)
sdiff - Merge two files interactively
sed - Stream Editor
select - Accept keyboard input
seq - Print numeric sequences
set - Manipulate shell variables and functions
sftp - Secure File Transfer Program
shift - Shift positional parameters
shopt - Shell Options
shutdown - Shutdown or restart linux
sleep - Delay for a specified time
slocate - Find files
sort - Sort text files
source - Run commands from a file `.'
split - Split a file into fixed-size pieces
ssh - Secure Shell client (remote login program)
strace - Trace system calls and signals
su - Substitute user identity
sudo - Execute a command as another user
sum - Print a checksum for a file
suspend - Suspend execution of this shell •
symlink - Make a new name for a file
sync - Synchronize data on disk with memory
t
tail - Output the last part of files
tar - Tape ARchiver
tee - Redirect output to multiple files
test - Evaluate a conditional expression
time - Measure Program running time
times - User and system times
touch - Change file timestamps
top - List processes running on the system
traceroute Trace Route to Host
trap - Run a command when a signal is set(bourne)
tr - Translate, squeeze, and/or delete characters
true - Do nothing, successfully
tsort - Topological sort
tty - Print filename of terminal on stdin
type - Describe a command •
u
ulimit - Limit user resources •
umask - Users file creation mask
umount - Unmount a device
unalias - Remove an alias •
uname - Print system information
unexpand - Convert spaces to tabs
uniq - Uniquify files
units - Convert units from one scale to another
unset - Remove variable or function names
unshar - Unpack shell archive scripts
until - Execute commands (until error)
useradd - Create new user account
usermod - Modify user account
users - List users currently logged in
uuencode - Encode a binary file
uudecode - Decode a file created by uuencode
v
v - Verbosely list directory contents (`ls -l -b')
vdir - Verbosely list directory contents (`ls -l -b')
vi - Text Editor
vmstat - Report virtual memory statistics
w
watch - Execute/display a program periodically
wc - Print byte, word, and line counts
whereis - Search the user's $path, man pages and source files for a program
which - Search the user's $path for a program file
while - Execute commands
who - Print all usernames currently logged in
whoami - Print the current user id and name (`id -un')
Wget - Retrieve web pages or files via HTTP, HTTPS or FTP
write - Send a message to another user
x
xargs - Execute utility, passing constructed argument list(s)
xdg-open - Open a file or URL in the user's preferred application.
Thursday, July 15, 2010
How to customize the Linux installation screen
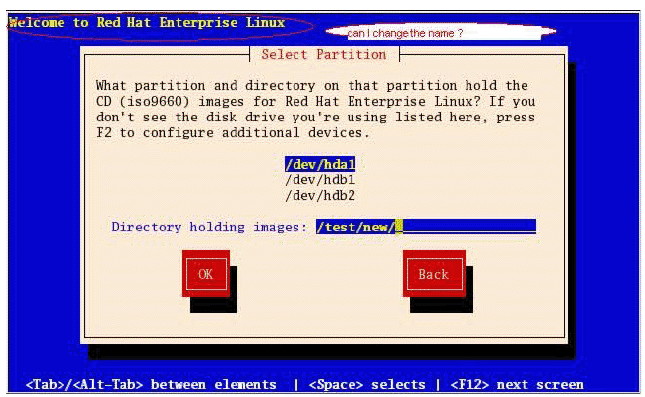
For changing the name “Welcome to Centos”
In the following example we are going to change “Welcome to Red Hat Enterprise Linux “
From .img to change the text:
1) copy the images folder from original dvd/cd
2) go to images folder as
cd images
3) make a directory name as :images1
4) mount the stage2.img image on images1 as
mount -o ro,loop -t squashfs stage2.img /mnt/images1
5) cd images1/usr/lib/anaconda/test.py and images1/usr/lib/anaconda/textw/1 and
images1/usr/lib/anaconda/textw/welcome_text.py change the “Centos” as your name.
6) Also change in images1/usr/lib/anaconda/textw/complete_text.py
7) make sure the permission of all the files remains same
-r--r--r-- 1 root root 19650 Jan 1 1970 text.py
[root@localhost textw]# pwd
/root/stage1/usr/lib/anaconda/textw
[root@localhost textw]# ll welcome_text.py
-r-xr-xr-x 1 root root 836 Jan 1 1970 welcome_text.py
[root@localhost textw]#
[root@localhost textw]# ll 1
-r-xr-xr-x 1 root root 836 Jan 1 1970 1
[root@localhost textw]#
-r-xr-xr-x 1 root root 836 Jan 1 1970 1
[root@localhost textw]# ll complete_text.py
-r-xr-xr-x 1 root root 1649 Jan 1 1970 complete_text.py
[root@localhost textw]#
For text to make .img image:
http://sipx-wiki.calivia.com/index.php/A_Kickstart_CD_for_sipX_on_CentOS
To change Welcome to Redhat linux to Welcome to My Server
mkdir ~/anaconda
mount -o loop my.iso
cd ~/anaconda
tar -cvf ~/stage2.tar .
cd ~
mkdir stage2
cd stage2
tar -xvf ../stage2.tar
cd ~
mkcramfs stage2/ stage2.img.new
mkcramfs are downloaded from net.
http://www.filewatcher.com/m/mkcramfs-1.1-34.i386.rpm.41284.0.0.html
mkdir /test
cp -av ~/anaconda/* /test
cp stage2.img.new /test/images/stage2.img
cd ~
copy this stage2.img to proper location and make the iso image and test it
Tuesday, June 29, 2010
Tricks to work with multiple files in Linux using Vi editor
First create the multiple files using touch command and now try to open these files at a time using vi editor as
vi file1 file2
This command will takes you to the first file, i.e. file1, that means you can edit the first file "file1" now. Once done, save the file and now you want to move to the next file, i.e file2.
For that you can use ":n" into your vi editor and press ENTER, then you will move to next file, that is file2.
Now you can do your work with file2 and now you want to come back to file1 again, for that use ":rew" into your vi editor, then you will be at the first file.
This sounds good if you are working with 2 files simultaneously, but what to do if you have number of files as file1, file2, file3, file4, file5,etc
Then for this also use the same command as above for opening the multiple files using vi as
vi file1 file2 file3 file4
Now you can follow the same procedure as mentioned to work with all these files, but one problem will arise this time is that when you are at the fourth file, i.e file4 and you have given ":rew" to come back to previous file, it will directly move to the first file, file1.
What will you do if you want to go to file2 or any particular file, for that you have to use
:e filename
e.g
:e file2 or :e file3
then you can move smoothly to the required files.
From this article, you can edit multiple files using vi editor.
Monday, June 28, 2010
How to recover a root password in Linux using single user mode
Follow the below steps to enter into the single user mode in linux:-
1. use the arrows to select the boot entry you want to modify.
2. press e to edit the entry
3. use the arrows to go to kernel line
4. press e to edit this entry
5. at the end of the line add the word single
6. press ESC to go back to the parent menu
7. press b to boot this kernel
Then your system boots and takes you to the single user mode by providing a console to you.
then you can change your root password using a command as
#passwd root
enter the password of your choice and reboot the system once.
Runlevels in Linux
0 - halt
1 - Single user mode
2 - Multiuser, without networking
3 - Full multiuser mode
4 - unused
5 - X11 (Full multiuser mode with X-based GUI
6 - Reboot
And you can change the the current runlevel by editing the file
/etc/inittab
go to line number 18 showing as below line -
id:3:initdefault:
this means currently you are using the runlevel 3 for your linux operating system. If you want to change it to runlevel 5, then just replace 5 with 3 in above line and save the file & reboot once.
Then you will start with runlevel 5, which is a full GUI mode.
Sunday, June 27, 2010
History of Linux
Linus Torvalds invented Linux itself. In 1991, Torvalds was a student at the
Subscribe to:
Posts (Atom)